Be you’re a beginner or advanced, tools like Pippit achieve professional results in audio editing and effortlessly handle the hard work for you.
Having a solid understanding of the fundamental concepts of trimming, polishing, and exporting edits makes every step easier for a more effective workflow.
Best practices like planning edit sequences, saving different versions, and systematically organizing files will improve the workflow.
To improve content quality, you may consider applying sound effects and voice enhancement features, along with other tools.
You are wrong if you think that only trained professionals have the ability to edit audio, as the times have changed.
Today, AI technology has allowed us to do everything, which makes it possible for even novice podcasters to improve their recordings.
It has also been found that 81% of professional editors believe that AI has significantly accelerated their workflow and productivity (Source: Business Wire).
As a recording editing tool, Pippit effortlessly allows users to edit recordings, which has made it popular among beginners who need simple, step-by-step instructions.
This guide will show you how to turn raw audio files into polished sound clips, guiding you through the editing process so the final product looks and sounds professional.
If you have always wanted to edit recordings and clips seamlessly and without any hassle, then just follow this guide, and you will find yourself editing like a pro.
Understanding the basics of audio editing
Before immersing yourself in editing, it is pivotal to understand the basic concepts given below:
Audio clipping: This little bit will be cleared so that the audio remains clear and smooth.
Fine-tuning: It is a mix of volume adjustments, pitch, and effects to improve the sound quality.
Exporting: When you’re done editing your audio, remember to save it in the right format you prefer, so you can access or share it in the future.
Next, let us explore how the subjects can be adjusted with the aid of AI concepts.
Best practice for starting
Below, I have shared some of the best tips for practice that you can consider to implement:
Do-Prepare your edits: Plan your edits in the first place, think of the intent and movement of what you’re putting together.
Small beginnings: Simple edits are fine, but you can move on to advanced features as your confidence builds.
Label your recordings high quality: Because you want to avoid intense cuts, your starting point would have to be a very good sound.
Save version: Save one or two versions at each editable stage, so you will always know where you are and can return in case of a major error during editing.
Adhering to these practices will shape the foundations of your experience in audio editing.
Step-by-step: Clipping audio with Pippit
Pippit, powered by CapCut, features a simple platform for audio editing. Here’s how to effectively clip your audio using Pippit’s effective audio clipper:
Step 1: Upload an audio file
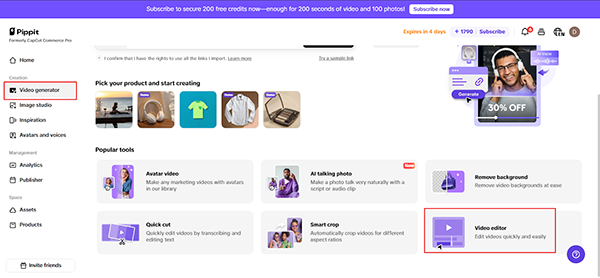
Now, visit the Pippit Online “Video Editor” by going to the “Video Generator” tab, and add audio.
Upload your audio file on the “Media” tab, or go for drag and drop in the working area.
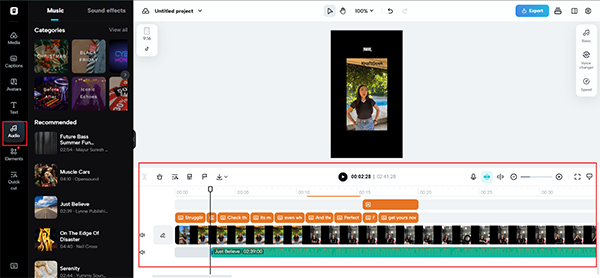
Step 2: Cutting or joining tracks
Apply the trimming feature to remove the unwanted parts, and for this, you can use the audio cutter and merge tool to cut and mix different audio files.
Set start and end markers for precise cutting, and make it even better by adding some effects, such as fade-in or fade-out, so that the project ends cleanly.
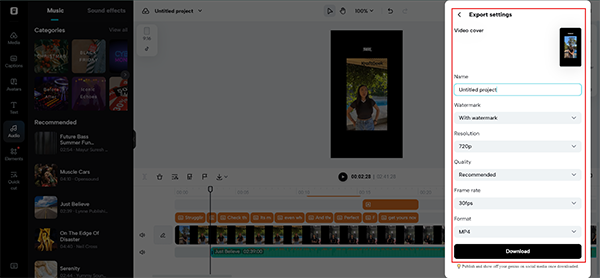
Step 3: Export your edited audio
After previewing the completed track, you may find it worthy of your expectations.
Afterward, proceed to click “Export,” where you can choose your preferred format, resolution, and bitrate settings for your audio.
You have now successfully completed your audio, which can now be integrated into other projects or shared freely.
Discovering more advanced features in Pippit
In addition to simple editing, Pippit provides advanced functions to boost your audio projects:
Voice enhancement: The tool can enhance voice clarity and tone automatically.
AI voice changer: It can also assist in changing voices in real time for creative enhancements.
Sound effects library: You can obtain a vast sound effects library to enhance your audio.
Beat detection: With a few clicks, you can seamlessly merge sound with images and video.
These powerful tools allow even novice users to produce high-quality audio content in moments.
Think like an editor: mindset shifts for improved audio clipping choices
Learn potent shifts to help you with audio clipping mastery, which will assist you with smarter, more thoughtful editing decision problems.
Cut with your listener in mind: Think about what your listener will expect from you—concise narrative, professional finish, or a relaxed tone—and cut.
Less is sometimes more: Trim fearlessly, even the bits you enjoy, if they aren’t helping achieve the end goal of your audio.
Buzz cut by rhythm, not waveform: Though the visual waveforms may be useful, always trust your ears as the best editing follows predetermined speech rhythms with natural pacing.
Safeguard your creativity: Always copy your raw file before doing major edits.
This allows you to have the freedom to play around without the risk of material erosion, thanks to strict delineation boundaries.
Honor the power of quiet: Lesser-known pauses create wonders, be it refining storytelling, accentuating impact, or allowing ideas to settle and seep in, rather than diluting every breath with noise.
A backward glance for further growth: Visit older jobs and examine your cuts.
There, you’ll notice things that you have improved, patterns you have set in place, and areas you can streamline within your workflow.
The image below from Synthesia.io shows the average time spent on training videos.
Sound improvement: tips and tricks
Here are some enhancements that will put sparkle into the audio:
Silent and whitespace cuts: Delete awkward silence or empty white space at the start or end of clips for a properly timed and professional feel.
Match tone and flow: Catch tonal change or jarring transitions between pieces. Re-cut or fade where necessary to stay consistent.
Employ fade-in and fade-out: Enhance the beginning and end of clips using soft fades to eliminate harshness while giving the smoother sound you want for your audio.
Layer the background tracks deftly: If ambient or background music is utilized, reduce its level to avoid competing with the main voice track.
Noise checks: Normalize audio so that clip-level loudness is evened out for the purpose of consistent level sounds, and improved listening experience.
Avoid overprocessing: Too much compression or NR gives an artificial character to sound, so keep minor tweaks and listen before exporting.
Have a fresh listen: Take some time out before doing the final audio, and then come back; you will find minor things that you might have missed the first time.
Raise your audio content to the next level with AI tools
Be you have the sophisticated skills of an audio engineer or are a novice in the editing world, editing audio files is no longer a mammoth task.
Pippit is one of the tools that AI offers, which enables anyone to effortlessly edit podcasts and interviews.
Following a couple of core principles, minimal best practices, and exploiting extra features can help your content’s quality be improved greatly.
These advanced editing tools are more than willing to offer learners of all levels the ability to enhance recordings and transform them into crystal clear audio.
Aim for the available tools today and go test them yourself, and I’m sure you won’t believe the difference!
Frequently Asked Questions
How do I begin using Pippit for audio editing?
Simply upload your audio file into the platform, use the trimming tools to cut unwanted parts, and export in your preferred format.
Will my recordings of my voice be clear after I use them on Pippit?
Definitely, Pippit has voice improvement options that enhance the clarity and tone of your recordings.
Does Pippit have a beginner mode?
Depending on your choice, you can export your audio files in different formats such as MP3, WAV, and many others.
Does Pippit have a beginner mode?
Pippit has an intuitive interface, and it guides new users with helpful tips and detailed, easy-to-follow instructions.
Am I able to place sound effects or background music while using Pippit?
Yes, Pippit allows its users to add extra sounds from its sound library and gives users the option to add background music, which makes the audio more captivating and well-rounded.

 Written By Shilpi Samantray