AI converts images into video by adding motion to them and changing the image into a single fluid motion, which converts it into a video, fully customisable by users.
How Influencers are Turning Images into Videos Using AI Workflows
 Written By Shephali Hazra
 Reviewed By: Khushi Choudhary
Popular content creators and influencers have found a way to boost their content production by turning static Image to Video AI files by just using AI smartly
With artificial intelligence taking centre stage, diversifying itself, and making itself useful in multiple fields, it has become almost impossible not to use AI and witness the greatness it provides
Therefore, Influencers and social media celebrities are continuously making use of AI and swiftly integrating it into their content-producing system, simplifying and decreasing their overall work, which ultimately lets them produce more videos from static images in a shorter amount of time.
Key Takeaways
- AI has become essential for video creation in modern times
- How does an AI create a video from a static image?
- Popular AI tools you can try yourself
- Benefits of AI in content creation on social media platforms
Why AI Video Creation Is Becoming Essential for Influencers
Generative AI has made it much easier for anyone to create compelling videos, all with an input of one prompt.
As it is capable of creating original and creative videos or images by itself, it has become essential for content creators and influencers.
Social media creators use generative AI to curate and make customised and engaging content for their audiences and viewers. It basically gives influencers much creative flexibility and a way for them to produce studio-quality content with a much faster content production rate than traditional methods.
Understanding Image-to-Video AI Workflow Basics
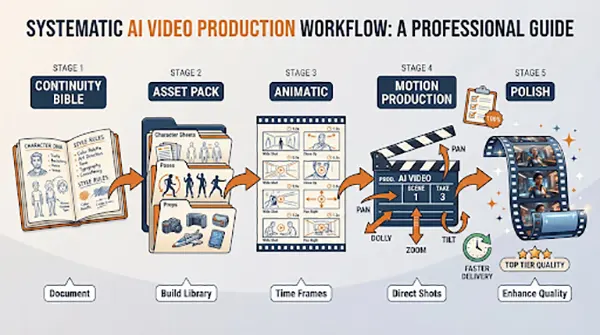
The basics of Image-to-Video creation with the help of AI include :
- Select and attach a high-resolution image from your files.
- Then, prompt the AI to give the image a particular type of motion like Dance, Clap, Move, Shake the camera, etc. It is basically you who directs the shots.
- After the prompting input, a resulting video is obtained from a static image, all with the assistance of AI, following its workflow.
- If you wish to make any more changes, you can always prompt the AI to review and edit the footage.
How AI Converts Static Images into Dynamic Video Content
Artificial intelligence has become quite advanced over the years of its development and is capable of even converting images to dynamic videos with consistent accuracy.
It understands the image provided by the user and all of its properties and then acknowledges the user’s prompt and creates a video from the given static image, following all the instructions carefully.
The result obtained is a high-quality AI-generated dynamic video curated perfectly to the user’s request.
Popular AI Tools Influencers Use for Image-to-Video Creation
Influencers leverage these AI tools to use for Image-to-Video creation :
- Canva – Probably the most popular AI tool right now, it’s because of its ease of use and ability to quickly create high-quality output in a short time.
- Capcut – Widely used AI tool for static to dynamic video conversion, it allows for further customisability after creation of the video.
- Runway – It is widely used for creating cinematic clips and short videos from static input.
- Pika Labs – It is ideal for motion effects and animations with good use of visual storytelling.
- Vidnoz AI – Offers a large collection of templates with an option to one-click-generated image to video creation.
So many different AI tools provide solutions to influencers; every tool specialises in something, making it even easier for content creators to choose tools which best support how they want their content to be created.
Did You Know?
The first AI chatbot was called ELIZA and was developed in 1966, 48 years before Amazon’s own chatbot Alexa.
Benefits of AI-Generated Videos for Social Media Campaigns
Videos generated by artificial intelligence provide many perks and benefits to social media personalities. It provides efficiency by automating many of the tasks required to make a video.
According to sources, Social media campaigns using Generative AI features result in 11% high click-through rate, which means that viewers are more likely to click and view content made by Generative AI than with traditional methods.
Engagement Growth
Generative AI has proven to be very beneficial for everyone, as even smaller creators with little to no setup can also get involved without spending lots of money to create a video.
With this ease of access and creativity, one can make engaging videos just from static images themselves, and can see the engagement growth happen in real-time.
Faster Content Production
With this new hyperfast technology and incredibly simple to understand workflow, content production has never been quicker.
People who want to be content creators can easily do so and prosper, too, with the correct use of the power and capabilities of AI.
Organisations report a 59% increase in the content creation process with the use of AI in the year 2026.
Creative Flexibility
People had limited thinking before AI was a thing, as they were restricted by supplies and resources of their time and other factors, but with the use of AI, the sky is the limit!
One’s own creativity can be accurately interpreted and understood by AI, and it can easily replicate what the user is trying to showcase with their video.
AI can now use its own new ideas and creativity into the mix with the addition of new features being introduced in many popular tools available to the public, which just increases the creative potential even more.
Final Verdict
Static images to dynamic video creation using Artificial Intelligence is definitely possible and profitable too. If a person understand it’s unlimited potential, they can harness it and shape their success in quick time with the use of existing AI tools. Better ROI, creative flexibility, and huge growth potential are just a few of the perks of using AI for content creation assignments.
Frequently Asked Questions
How does AI make images into videos?
What are the popular AI tools used for image-to-video creation?
Capcut, Canva, Pika Labs and Runway are some of the most popular and useful AI tools used to create videos from static images.
Which social media platforms support AI content?
Content generated by AI is supported by major social media platforms like YouTube, Instagram, X (Twitter), and Facebook.
What are the benefits of creating content by AI?
AI-generated content has been proven to provide better return on investment, engagement and more creative freedom with little time required to spend than traditional methods.
Related Posts